Tuesday, February 15, 2011

DB 6 - Documenting the great depression

Why the project has significant impact on the society?

The Great Depression was a terrible economic depression, and it was a really hard time for everybody. During the period, those wealthy people became penniless; those poor people could not afford the basic needs to support their families. The main problem of the great depression was the unemployment problem. There were a lot of people lost their jobs or could not get a job during the time. Many families were force to move from their home to search for work.  All of these caused a lot of people get the key of the street.

On the website - "FSA/OWI B&W PHOTOGRAPHS", it states that " Farm Security Administration(FSA) is a landmark in the history of documentary photography. The images show Americans at home, at work, and at play, with an emphasis on rural and small-town life and the adverse effects of the Great Depression, the Dust Bowl, and increasing farm mechanization. Some of the most famous images portray people who were displaced from farms and migrated West or to industrial cities in search of work. " (http://memory.loc.gov/ammem/fsahtml/fahome.html)

In my opinion, the FSA collection had a significant impact on the society, because when the photographs were published, they would be disseminated all over the world. Everybody could understand how hard are Americans lives. Again, those photographs from FSA are historical proof from the great depression. Today, if you look at those photographs, and you could totally feel that the huge stress of the life from the great depression period.

Bud Fields and his family. Alabama. 1935 or 1936. Photographer: Walker Evans.
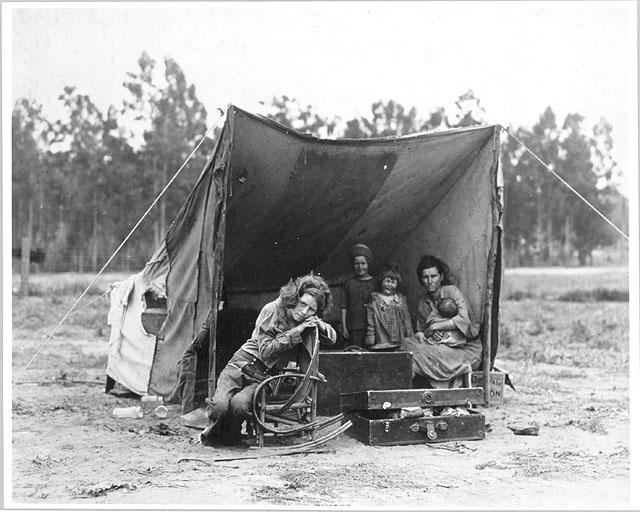
Squatter's Camp, Route 70, Arkansas, October, 1935.
Photographer: Ben Shahn


What was the role of Migrant Mother photograph in the period or great depression and what is it nowadays?


Dorothea Lange was a famous American documentary photographer who worked for the Farm Security Administration (FSA) during the great depression. Migrant Mother is her famous photograph collection. In these photographs, you could see a upset and desperate mother, and her children are leaning around her with the hungry face. Although that mother’s age was thirty-two, she looked much older than her age in the photographs. The role of the Migrant Mothers” provided society with strong proof of the effects of the Great Depression. From the background of the photograph, you could see how severe are their life; from the mother’s eye, you could see that she is in deeply helpless with her family. So nowaday, I believe that “Migrant Mother” photographs are good lesson for us to understand that what they got during the Great Depression and World War II, and the evidence encourage us to join hands and offer a helping hand.

Migrant Mother. Photographer: Dorothea Lange
.
The photograph that has become known as "Migrant Mother" is one of a series of photographs that Dorothea Lange made in February or March of 1936 in Nipomo, California. Lange was concluding a month's trip photographing migratory farm labor around the state for what was then the Resettlement Administration. Photographer: Dorothea Lange


Reference List:

"America from the Great Depression to WWII", Dec 15 1998. American Memory. Feb 15 2011 http://memory.loc.gov/ammem/fsahtml/fahome.html.

Photographs:

1. http://lcweb2.loc.gov/pnp/ppmsc/00200/00234r.jpg
2. http://lcweb2.loc.gov/pnp/ppmsc/00200/0041r.jpg
3. http://lcweb2.loc.gov/pnp/cph/3b40000/3b41000/3b41800/3b41800r.jpg
4. http://lcweb2.loc.gov/pnp/ppmsc/00200/00230r.jpg


Tuesday, February 8, 2011

Assignment 2 Photo Manipulation Assignment

Photography and ethic: You as a photographer who edited/altered images


As we discussed the past week, there are so much different between the modern photography skill and the early days skill, and photo enhancement is a strong example to prove this point, so in thisa week, I am gonna try to be a photography to edit a photo in order to show you how people ususally edit their photo.

For photo enhancement, you do not really need a lot of professional softwares to perform it, but just a simple tool - Adobe Photoshop. Now, I am going to use photoshop to show you how to edit a photo. I believe that there are so many people got upset about their pimples, and run away from the camera when peolple are taking picture. However, if you  use the skill I recommending below, then you will not get upset about the pimples anymore. The first original photo below is just random searched by me from google image, you could see the girl's face is full of pimples, I believe that it will not be hided even if put on make up, but photoshop could solve the probelm. First step, zoom into the area needing to be edited. Second step, click on the healing brush tool, and resize the tool to a size large enough to cover the largest range. Third step, find an area that is clear with a similar color as the area you are trying yo edit, press the "ALT" button(on the keyboard) and click on that clear area to pick up the color range. Fourth step, randomly click on each pimple to cover it with a similar color and texture of the clear area. Finally, do the same steps agian to different area of the pimples. Now you could see the pimples on the face are all gone, and I suggest you to change the lightness higher in order to make the skin looks more white. Then you could see a totally different face with perfect skin just like the second photo below.
                                                             Before
Photo resource from Google Image


After


Again, I am going to show you another magic of photoshop. The first original photo below is randomly searched from google image. In the image, you could see a lady is really fat. Now if you follow my steps to edit the photo, then you could use your magic to make her become a skinny lady. First step, click on Filter menu and select Liquify. Second step, in the liquify effect window, click on the freeze tool to apply the freezing function. The freezing function is used for freezing the area in the photo that you do not want to edit. Third step, you start to highlight the parts of the body which u need to make thin. Fourth step, go to the tool bar again, to seclect the wrap tool, and change it to the ideal size you want. Finally, you could use the wrapping brush to touch the edges of the body area with to make them look thin. For this skinny skill, you need to touch the edges of the body carefully, or you would make the body looks abnormal. And the second photo below is the one after I edit, you could see how is the photoshop magic!

                                                                        Before

Photo resource from Google Image

After


For all of you, if you try more, then you will discover more photo skills for photo editing. In conclusion, photo enhancement is a magic!


Reference List:

Google Images